Lights
Adding a light
Choose a type (Area, Spot, Sun or Point) and click Add Light. The light joins the active rig, aimed at its centre. Lights you add this way survive kit swaps.
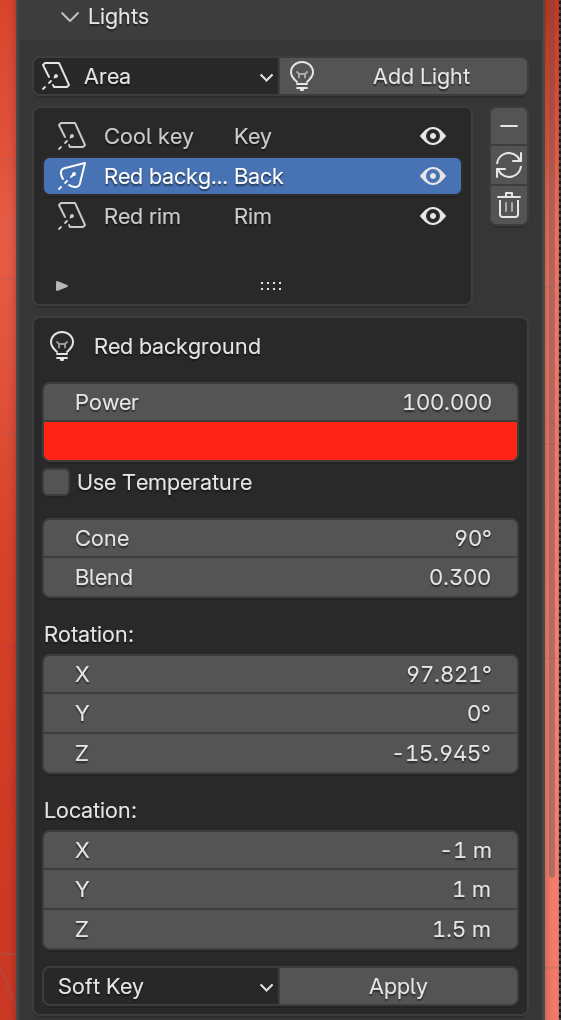
The light list
Every light on the rig, with its role (Key, Fill, Rim, Back, Top). Click a row to edit that light. Selecting a light in the viewport or Outliner works too.
| Button | What it does |
|---|---|
| Minus | Removes the selected light. |
| Refresh | Rebuilds the list, for example after you delete a light in the Outliner. |
| Trash | Deletes every light on the rig. The floor stays. |
Editing a light
The box under the list edits the selected light directly.
| Control | Applies to |
|---|---|
| Power, colour | All lights |
| Use Temperature, Temperature (Kelvin) | All lights (Blender 4.3 and newer) |
| Shape, Size X, Size Y | Area |
| Cone, Blend | Spot |
| Angle | Sun |
| Radius | Point |
| Rotation, Location | All lights (a Sun only uses rotation) |
Light presets
Pick a preset in the dropdown at the bottom of the editor and click Apply. It sets the selected light's power, colour, size and temperature.
| Preset | Look |
|---|---|
| Soft Key | Broad, neutral key |
| Hard Key | Small, punchy key with crisp shadows |
| Cool Fill | Low, cool fill |
| Warm Rim | Warm separation light |
| Golden Hour | Warm, low-temperature wash |
Things to know
- RedLight's lights are hidden from the camera. They light the scene and show in reflections, but the light itself never appears in the render.
- Master and Exposure at the top of the panel act on every rig light at once. See The Panel.